Moving to Japan with a Dog: Jager’s Journey from Chicago
Japan has strict requirements when it comes to bringing dogs, but with good preparation, the process can go smoothly. As long as you follow all the necessary steps, your furry friend will be welcomed too.
If you're planning to bring your pet to Japan, I hope our story helps you prepare. It's all about planning ahead and knowing what to expect. You can download the free Dog Relocation Checklist Japan from the Freebie Shelf.
Note: This blog assumes you’re bringing a dog from the United States to Japan, specifically from a non-designated region (more on that below). The process may vary slightly depending on your country of origin.
Here’s what we’ll cover:
Before the Flight: The 7-Month Preparation
Booking the Flight
Arrival in Japan
Settling into Japan
Daily Life with Jager
Emotional and Practical Advice
Wrapping Up: Costs and Final Thoughts
———————————————
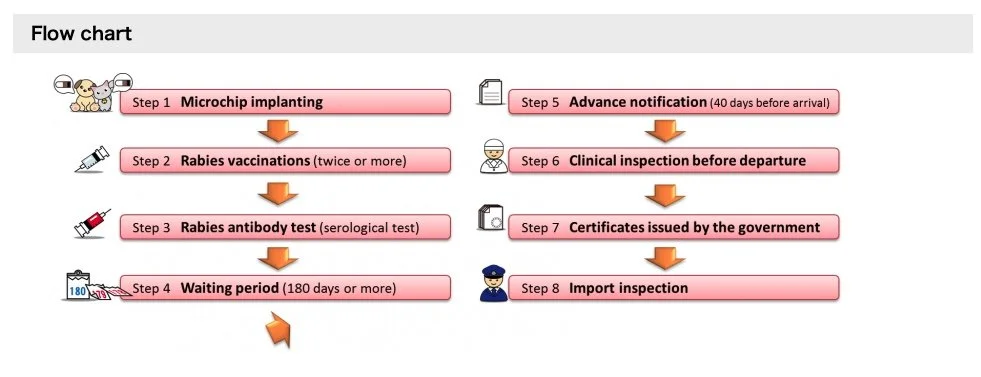
1. Before the Flight: The 7-Month Preparation
Bringing a dog to Japan requires early and meticulous preparation. Japan is a rabies-free country with strict quarantine laws, meaning the process starts at least 7 months before your dog’s entry. The rules differ depending on where you’re coming from:
Designated Regions (6 regions only): Iceland, Australia, New Zealand, Fiji Islands, Hawaii, and Guam have a simpler process due to their rabies-free status.
Non-Designated Regions: Everywhere else, including the United States, follows a more rigorous procedure. Since we were coming from Chicago, we followed the non-designated region process.
Here’s an overview of the steps we took, based on guidelines from Japan’s Ministry of Agriculture, Forestry and Fisheries (MAFF) Animal Quarantine Service (AQS) website: MAFF Guidelines.
Source: https://www.maff.go.jp/aqs/english/animal/dog/import-other.html
Step 1: Microchip Implantation
Jager needed to be microchipped with an ISO-compliant chip (ISO 11784/11785 standard). This must be done before any rabies vaccinations, as the microchip number is tied to all subsequent paperwork. If the microchip isn’t ISO-compliant or can’t be read upon arrival, your dog may face a 180-day quarantine or be sent back at your expense. We had Jager’s microchip implanted at our vet in Chicago, and we double-checked the number on all documents to avoid any issues.
Step 2: Rabies Vaccinations (Twice or More)
Japan requires two rabies vaccinations after the microchip is implanted, with specific timing:
First Rabies Vaccination:
The dog must be at least 91 days old (counting the date of birth as day 0).
It must be administered after the microchip implantation (same day is acceptable).
Second Rabies Vaccination:
At least 30 days after the first vaccination (counting the first vaccination date as day 0).
Within the effective period of the first vaccination (usually 1–3 years, depending on the vaccine).
Important Notes:
Only inactivated (killed) virus vaccines or recombinant/modified vaccines are accepted—live virus vaccines are not allowed.
You must bring the original signed Rabies Vaccination Certificates with your pet to Japan.
Jager’s Story: In the U.S., rabies vaccines often last three years. When we started preparing for Japan, Jager’s vaccine was nearing its expiration. Instead of going straight to new shots, we tried a titer test—as expected, his antibody levels didn’t meet Japan’s standards. That meant two new rabies shots and another blood test. Looking back, I wish we had just gone ahead with the vaccinations to spare him that extra needle poke. If only we had planned further in advance, we might have saved him the stress.
Step 3: Rabies Antibody Test (Serological Test)
After the second rabies vaccination, Jager needed a rabies antibody test at a designated laboratory. The blood sample must show an antibody titer of at least 0.5 IU/ml to meet Japan’s requirements. Our vet sent Jager’s sample to a lab approved by Japan and thankfully, his results met the threshold. This step is critical.
Step 4: Waiting Period (180 Days or more)
Dogs must arrive in Japan at least 180 days after the blood sample for the rabies antibody test is taken. Additionally:
The arrival date must be within the validity period of the rabies vaccine (check the expiration date).
The rabies antibody test result is valid for 2 years from the blood sampling date.
If the 180-day waiting period isn’t complete, your dog will be quarantined at an AQS detention facility in Japan to make up the remaining time. We strongly recommend completing the waiting period before arrival to avoid this.
Step 5: Advance Notification (40 days before arrival)
You must notify the Animal Quarantine Service (AQS) at your expected port of entry (e.g., Haneda Airport) at least 40 days before arrival. We submitted the notification form via email using the templates provided by AQS:
How to Fill in the Notification (Non-Designated Regions)
Alternatively, you can submit through the NACCS online system, though first-time users need to register for a user ID. After submitting, AQS reviewed our documents and issued an “Approval of Import Inspection of Animals,” which we printed and kept for export and boarding procedures. Actually, we tried using NACCS, but it wasn’t very user-friendly. So instead, we contacted them by email—and the response was excellent.
Step 6: Clinical Inspection Before Departure (Pre-Export Inspection)
Within 10 days of departure, your dog must undergo a clinical inspection by a veterinarian to confirm they’re free of rabies and, for dogs, leptospirosis. This involves a thorough health check to ensure there are no clinical signs of these diseases.
Our Mistake: Amid the chaos of selling our house, moving, and dealing with COVID restrictions, we forgot to schedule Jager’s clinical inspection. It was a stressful oversight, and we had to re-schedule the flight. Don’t make the same mistake—set reminders for this crucial step.

Step 7: Certificates issued by the U.S. Government Agency
You’ll need official certificates from a government agency (in the U.S., this is typically the USDA) endorsing your dog’s health and compliance with Japan’s requirements. These certificates must include:
Individual information
Microchip number and implantation date.
Rabies vaccination dates, effective period, vaccine type, product name, and manufacturer.
Rabies antibody test details (blood sampling date, antibody titer, and lab name).
Results and date of the clinical inspection.
We worked with our vet to compile these documents, which the USDA then endorsed. Having everything in order here saved us from potential delays at the border. To our relief, the USDA’s endorsement process was fairly quick.
A Big Tip—Our Vet Made a Difference
An experienced vet can be a lifesaver. We went to Arlington Animal Hospital in Chicago, where the staff had worked with Japanese expats many times before and were familiar with Japan’s requirements. Our flight was in November. The vet knew that airlines often refuse to fly pets if the temperature drops below 32°F (0°C) due to safety concerns.
She wrote a letter confirming that Jager had enough coat and resistance to tolerate the moderate cold expected in November, which reassured Japan Airlines (JAL). And it was 31°F.
Actually, due to COVID, our flight had only 30+ passengers, so JAL staff gave Jager extra attention during the journey. As a result, he didn’t have to wait in any cold holding areas.
Step 8: Import inspection - Arrival in Japan
We landed at Haneda Airport on November 28, 2021. Because we had submitted the Advance Notification form 40 days prior, the Animal Quarantine Service was ready for Jager’s arrival. An AQS officer checked the following:
Official certificates a government agency endorsed.
Our landing form and crate label.
The inspection took less than an hour. After completing our COVID test and paperwork, we found Jager waiting for us in the baggage claim area with his import quarantine certificate already issued. If you miss any requirements, your pet could face up to 180 days in quarantine—or be sent back—so preparation is critical.
2. Booking the Flight
(Sorry if it feels out of order—booking actually comes after the final inspection at Haneda. I’m just following the AQS process chart!)
We booked a direct flight from Chicago O’Hare to Haneda Airport with Japan Airlines (JAL). The cost was $700 for Jager’s accompanied flight fee, plus a $50 airport entry ticket. (An accompanied flight means the pet’s owner is on the same flight.)
Tips for Booking and Flying:
Prepare all quarantine documents yourself and contact Japan’s AQS directly. It’s your responsibility. (See -> Step 5: Advance Notification)
Arrive at the airport at least 2 hours early. We had to submit JAL’s pet confirmation form at check-in.
Use an IATA-compliant crate. Attach a water dispenser and include a small towel or item with a familiar scent to reduce stress. We laid down my husband’s old sweatshirt in Jager’s crate, which helped him feel more secure.
Practice crate training in advance. Jager spent a few weeks getting used to his crate, which made the flight less stressful for him.
Bring extra copies of documents. Customs may ask for them multiple times, so it’s better to be overprepared.
*Note breed restrictions: JAL does not accept French Bulldogs or Bulldogs due to their respiratory issues, which can be exacerbated during flights.
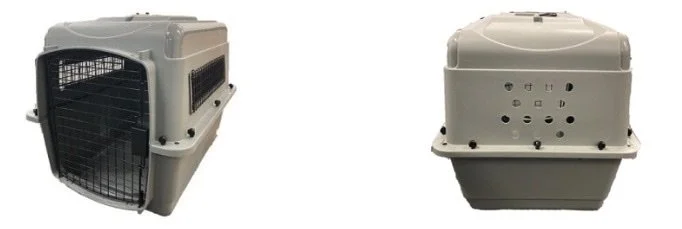
Jager’s crate: 80 x 60 x 70 cm: Jager can stand, turn, and lie down naturally
Looking back, we learned about pet relocation services that coordinate everything—from working with your vet to handling AQS paperwork. While we managed without one, it’s an option worth considering if you want extra support.
From the Airport to Home
We arranged a large airport taxi through Airport Taxi Tokyo. The taxi was spacious enough for Jager’s crate, two adults + Jager, and three suitcases. The 1-hour ride to our home in Kanagawa cost ¥30,000 (about $200 at the time).
4. Settling into Japan
Housing
Finding pet-friendly housing in Japan can be tricky, as not all buildings allow pets, and some only permit small dogs. We searched for an apartment in Kanagawa using filters like “ペット可” (pets allowed) on real estate websites.
Our building required us to join a pet owners’ club, which helps manage pet-related issues. For example, if there are complaints about noise/barking or waste, the club leader distributes a notice to members to address the problem. This system fosters accountability and ensures a harmonious living environment.
Ward Office Registration
In Japan, dogs must be registered at the local ward office within 30 days of arrival. We took Jager’s import quarantine certificate and our residency documents to the ward office in Kanagawa, where he was issued a dog tag (kannsatsu). This tag must be updated annually, and rabies vaccinations are mandatory each year, typically in the spring. If your dog doesn't have the tag, it may be considered a stray.
Vet Visits and Insurance
We tried two vets in Kanagawa before settling on the second one, who has been wonderful with Jager. As Jager is now a senior dog, he needs more care, and our vet has been attentive, even offering accommodation services for ¥2,500 per night. This is a lifesaver when we travel, as the vet can administer Jager’s medications during his stay.
If you are interested in pet insurance, check out our blog on pet insurance for more details:
https://www.navigatorjapan.com/blog-2-1/hnaobhi1ej4y8dfb1rhr4f0v0k3e74
5. Daily Life with Jager
Grooming
Grooming in Japan is a serious affair, and the attention to detail is impressive. We found a local groomer near our apartment who adores Jager’s stubborn personality. A full grooming session—bath, haircut, nail trim, and ear cleaning—costs ¥6,000 and takes 2 to 2.5 hours. Jager always comes back looking and smelling great, and the groomer gives him a little bandana as a finishing touch.
Dog Food and Toys
You can find a wide range of dog food and toys in Japan, both online and in stores. We order Jager’s favorite, Purina One for senior dogs, from online retailers like Amazon Japan.
For treats and toys, we visit local home centers or small to medium-sized pet shops. While there aren’t large pet stores like PetSmart in Japan, the options available are high-quality, and Jager has been happy with his new toys.
Parks and Dog Culture
Japanese cities are pet-friendly in many ways, but the culture differs from the U.S. Dogs must be leashed at all times in public spaces, and owners are expected to carry poop bags and water to clean up after their pets. Waste must be taken home for disposal, as public bins for pet waste are rare.
Some parks in Kanagawa have small dog runs. We’ve noticed that Japanese dog owners are very responsible, and this culture of respect makes public spaces pleasant for everyone.
Pet Sitters and Care Services
For times when you can’t take your dog with you, pet care services are available.
6. Emotional and Practical Advice
Bringing Jager to Japan was a significant commitment, but it was worth every moment of effort.
For my American husband, who had just relocated from the U.S., Jager was more than just a pet—he was a steady source of emotional support through all the stress and uncertainty. When we reunited with Jager at Haneda Airport after the flight, my husband nearly cried with relief, seeing his loyal friend safe and sound.
Jager has also been a bridge to our new community—his wagging tail and friendly demeanor have sparked conversations with neighbors and strangers alike, helping us feel more at home in Japan.
Advice for Pet Owners Moving to Japan
Start early—the 180-day rule is strict
Plan ahead and mark critical dates on your calendar
Confirm pet-friendly housing before arrival
Register and vaccinate your dog annually
Be patient with cultural differences. Japan’s pet culture emphasizes responsibility—embrace it, and you’ll find it rewarding.
7. Wrap Up: Costs and Final Thoughts
Moving to Japan with a pet is entirely possible. The process requires planning, money, and patience, but Watching Jager trot through cherry blossom petals in spring or snore peacefully on the bed makes it all worthwhile.
Total Costs (Y2021)
Here’s a breakdown of what we spent to bring Jager to Japan:
Flight (JAL cargo fee): $700
Airport entry ticket: $50
Rabies vaccinations and antibody test: $300
Vet visits and clinical inspection: $150
USDA document endorsement: $100
IATA-compliant crate: $100
Airport taxi: $200
Total: Approximately $1,600
Costs may vary depending on your location, vet fees, and travel arrangements, but this gives you a rough idea. Keep in mind that prices have likely increased since 2021 due to inflation and changes in airline policies.
You can download the free Dog Relocation Checklist for Japan from the Freebie Shelf.
Useful sites:
https://www.maff.go.jp/aqs/animal/dog/attach/pdf/import-other-42.pdf
If you have questions or need more guidance, feel free to reach out—Jager and I are happy to share what we’ve learned!